Transfer Hub_
Transfer Hub manages equipment moving directly between opportunities. It has two connected parts: Planned Transfers, created in Order View, and Transfer Out, completed in Detail View.
A Planned Transfer records what should move, where it is coming from or going to, the quantity, and the transfer date. Transfer Out is used later to move the actual booked-out assets or Bulk Stock to the destination opportunity.
Planned Transfers — Order View
Planned Transfers allows you to organise future job-to-job stock movements before the equipment is prepared or booked out.
How it works
• Planned Transfers are created and managed from Order View
• Choose whether equipment is coming from another job to the current job, or going from the current job to another job
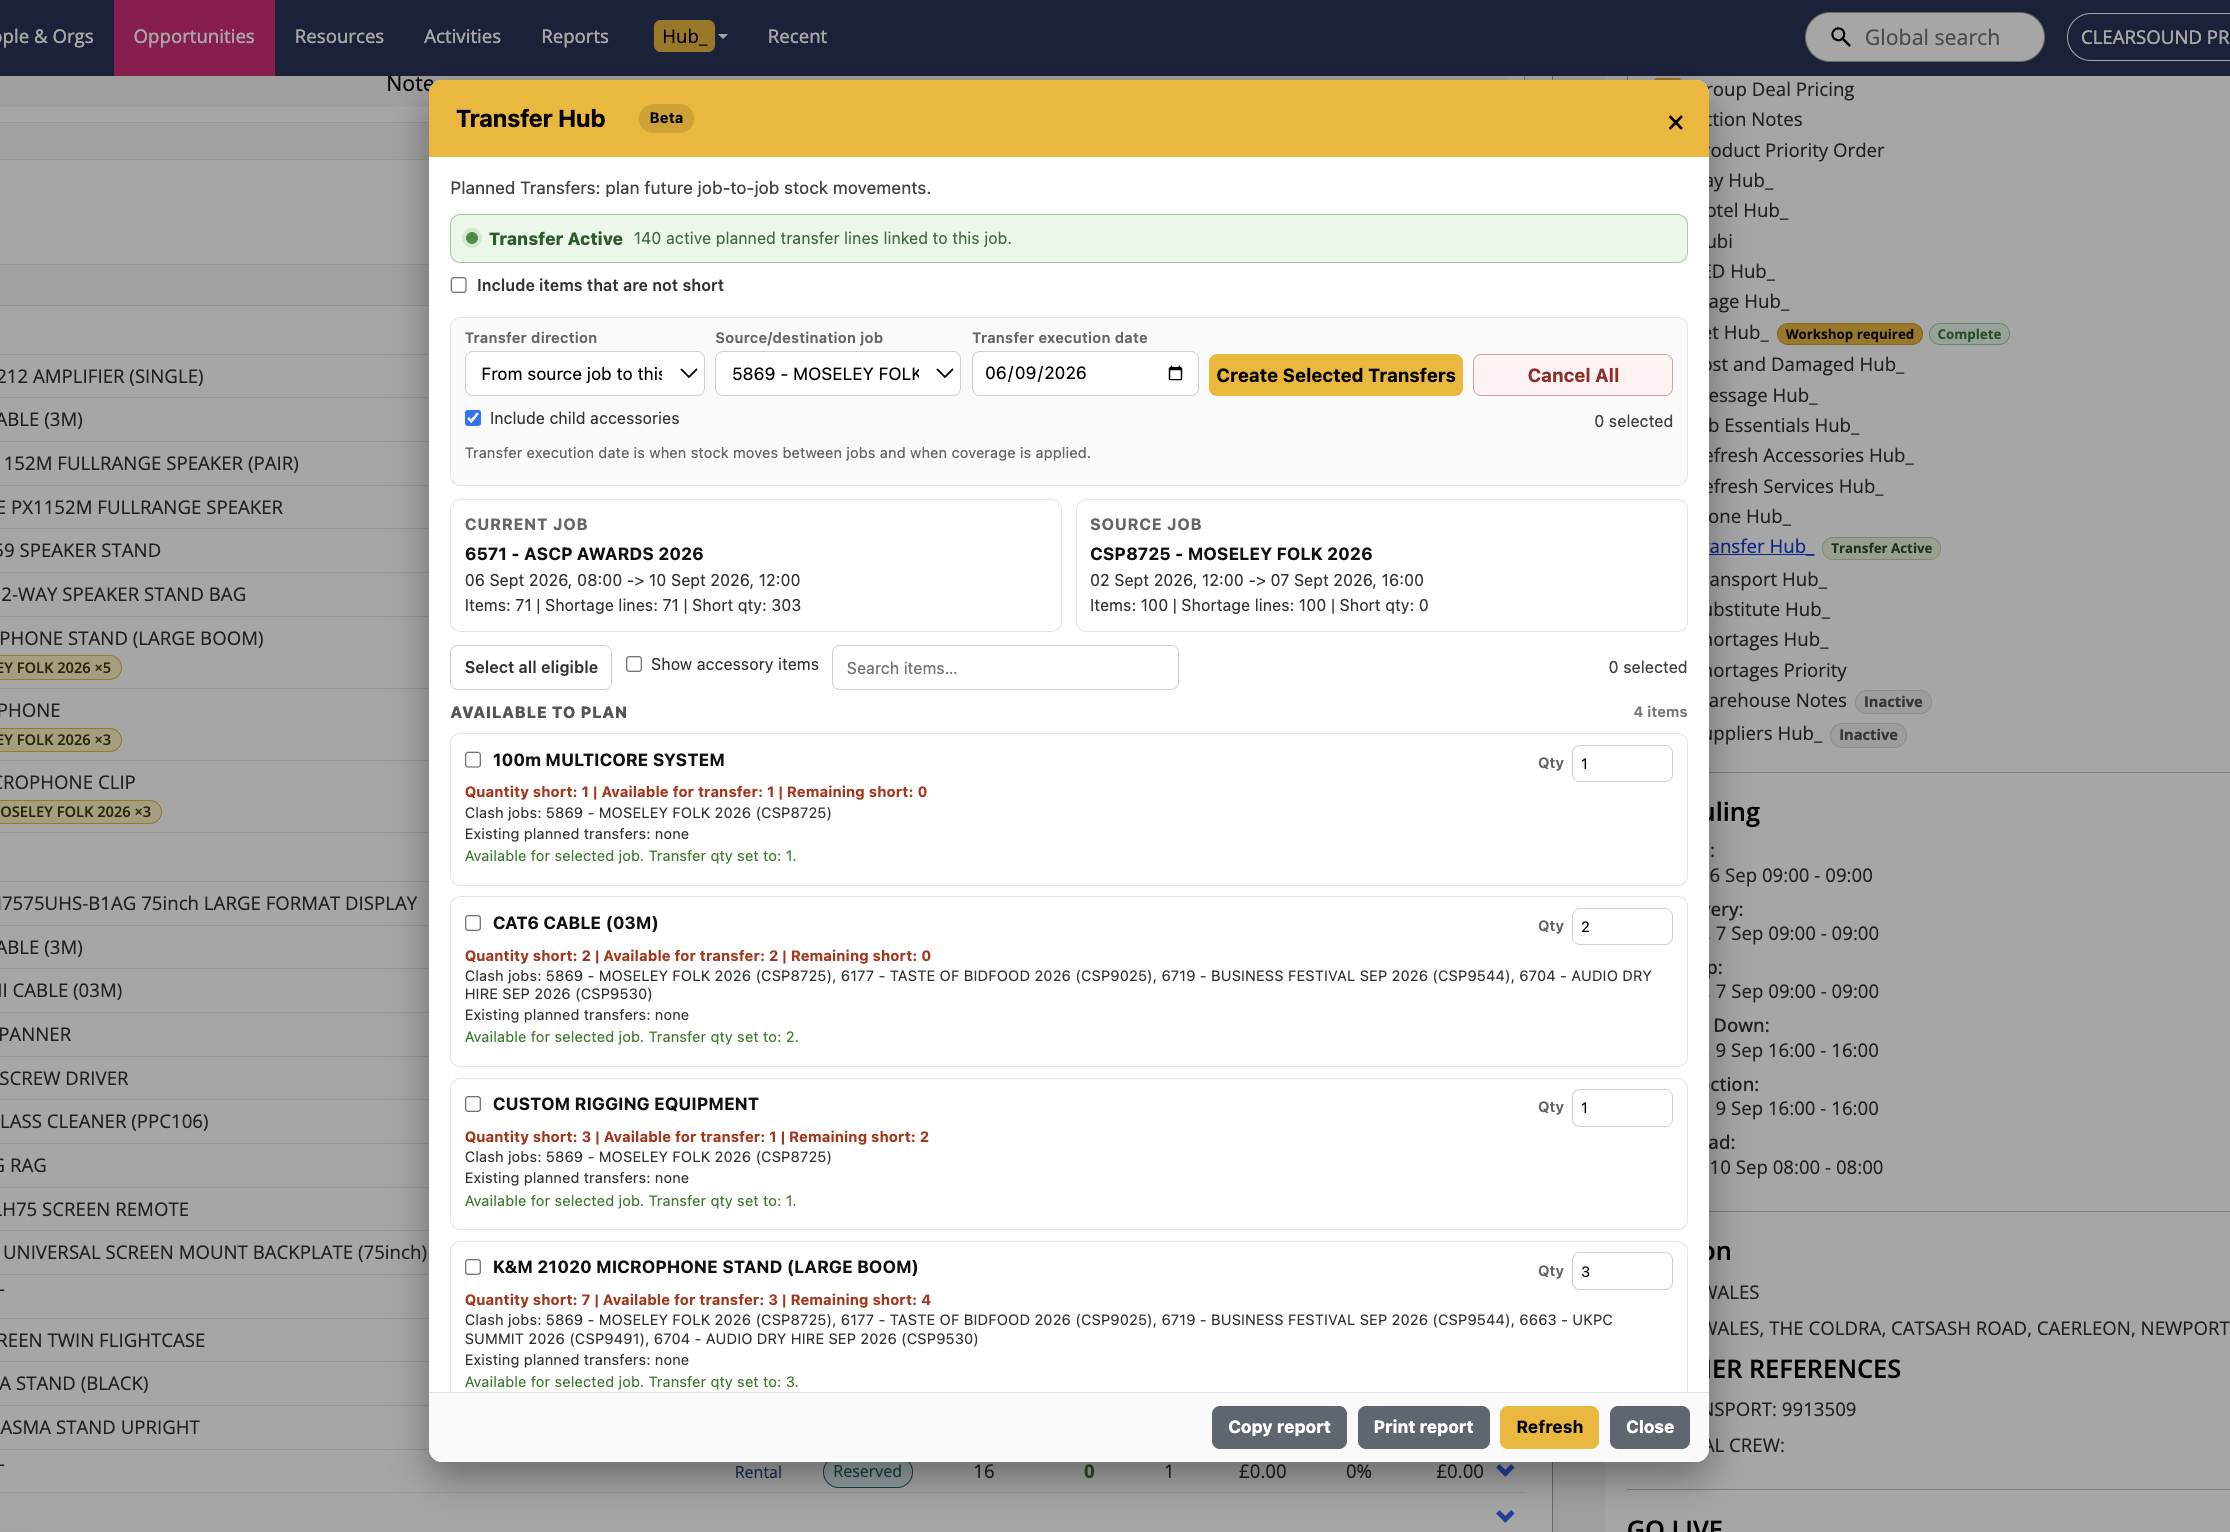
• Transfer Hub checks the current opportunity’s shortages and identifies overlapping jobs containing matching products
• Select the source or destination opportunity, transfer date, items, and quantities
• Transfer quantities are checked against the source job so you cannot plan more stock than it can provide
• The transfer date determines when the stock movement affects the projected availability
• Enable Include items that are not short when you want to transfer equipment that is not currently showing as a shortage
• Enable Include child accessories to include applicable accessories connected to the selected parent products
• Transfer Hub prevents a duplicate transfer from being created for the same item and route
Transfer directions
• From source job to this job means equipment is coming into the opportunity currently being viewed
• From this job to destination job means equipment will leave the current opportunity and continue to another job
• Always check the direction before saving, as this controls which opportunity supplies the equipment and which opportunity receives it
To create a Planned Transfer
• Open the opportunity in Order View
• Open Transfer Hub_ from the Hub_ menu
• Choose the required Transfer direction
• Select the source or destination opportunity
• Choose the Transfer execution date
• Tick the items you want to include
• Review or adjust the transfer quantity for each item
• Use Select all eligible if you want to select every available item shown
• Use the item search when working with a large equipment list
• Select Create Selected Transfers
• Transfer Hub will save the plan and update both linked opportunities
Adding an individual item
• Open the item’s dropdown menu in Order View
• Select Add to transfer
• Choose the transfer direction, linked opportunity, date, and quantity
• The Add to transfer option is hidden when that item already has a transfer on the same route
• Existing transfers should be changed using Edit or removed using Delete
What appears after saving
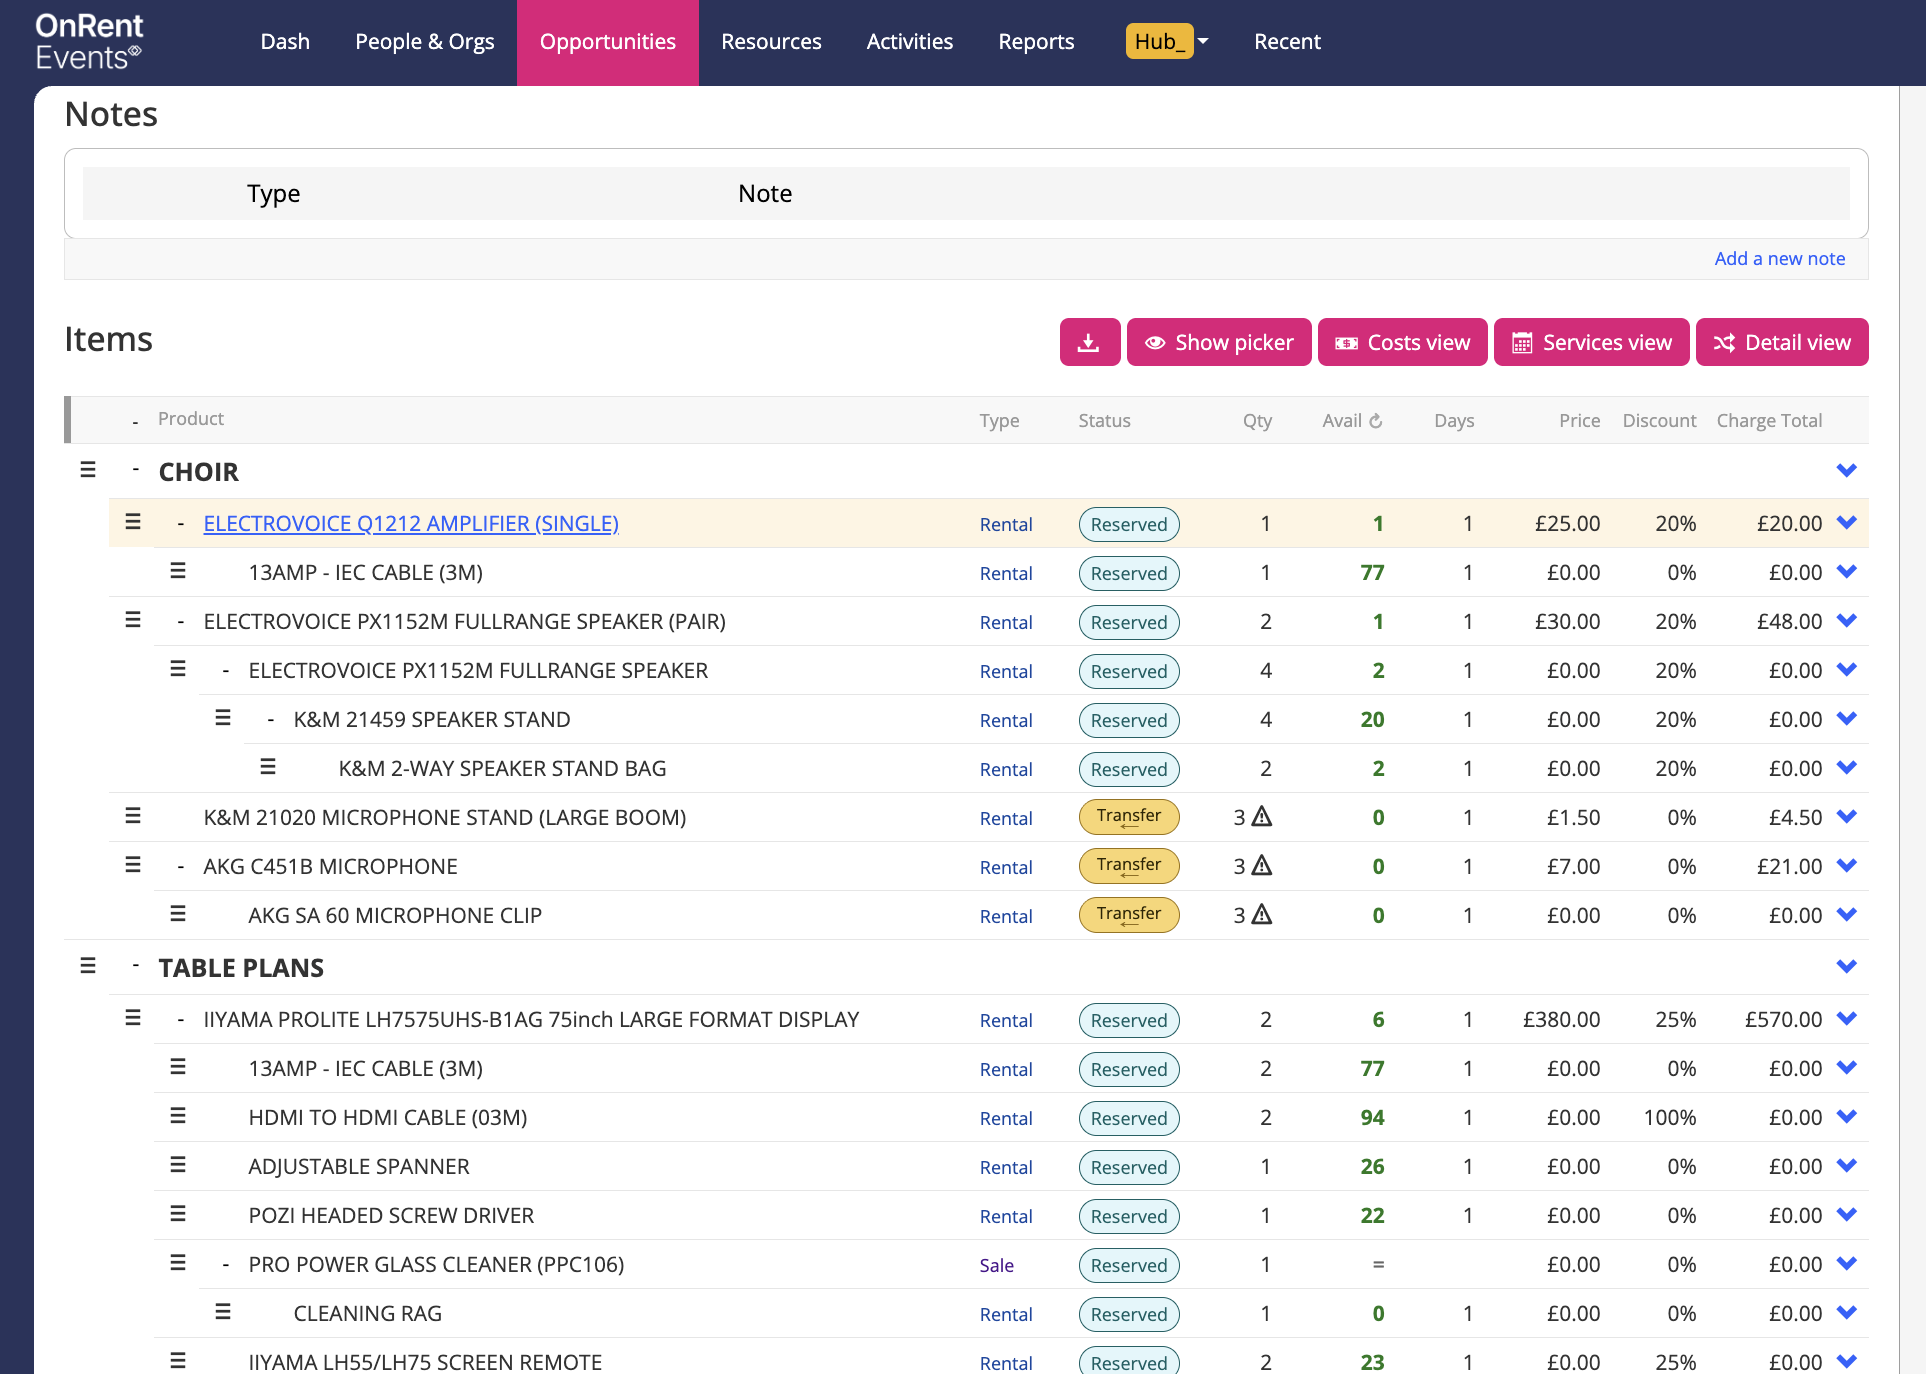
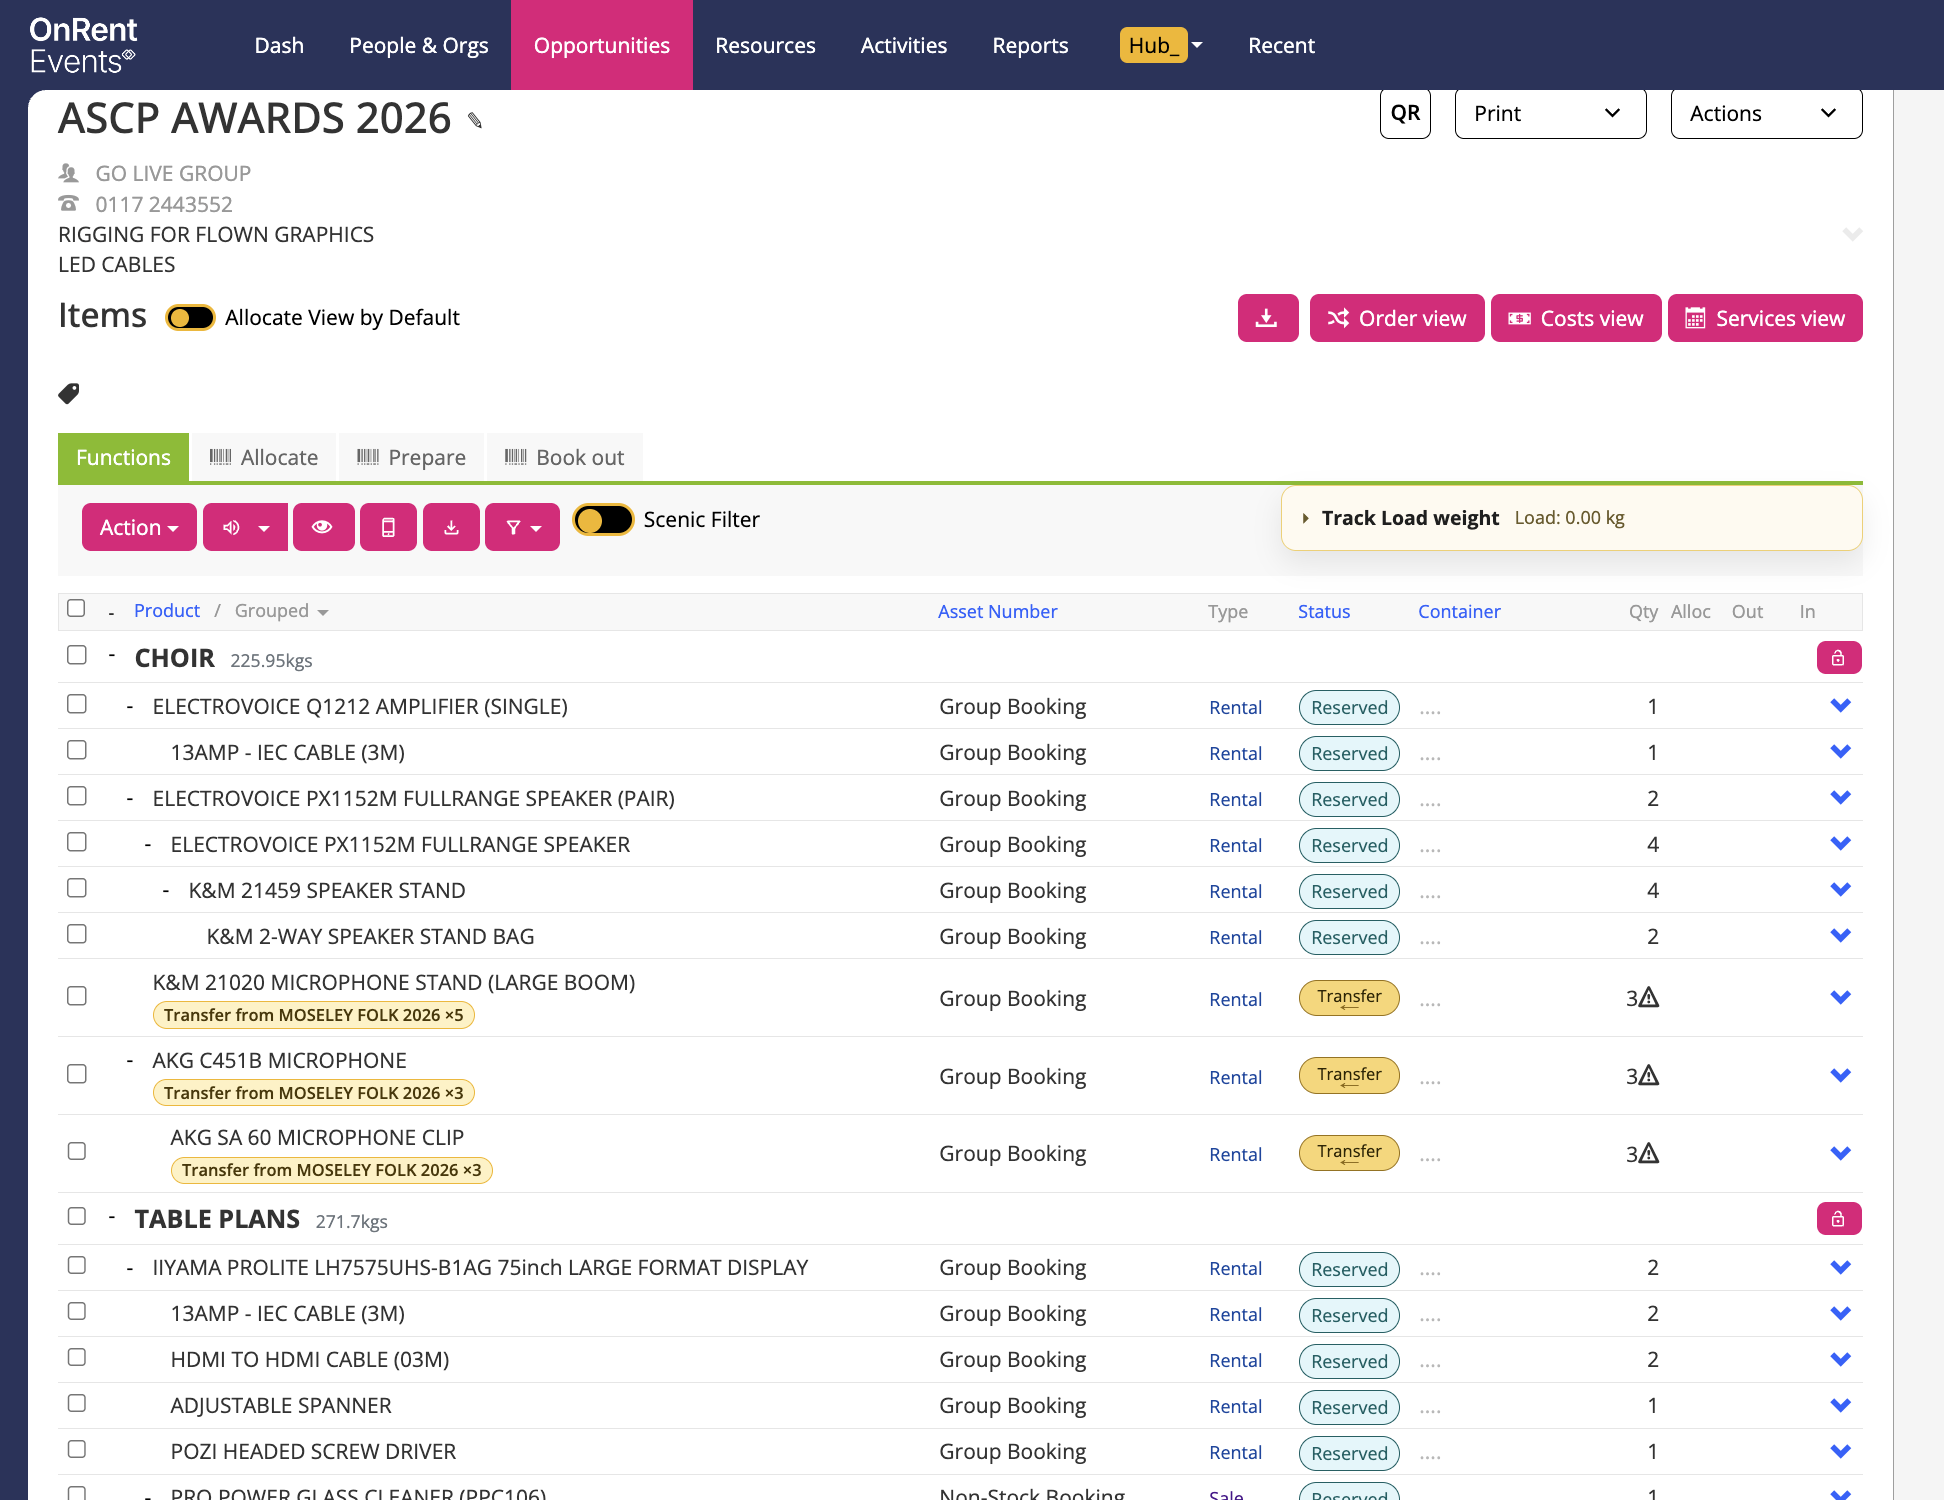
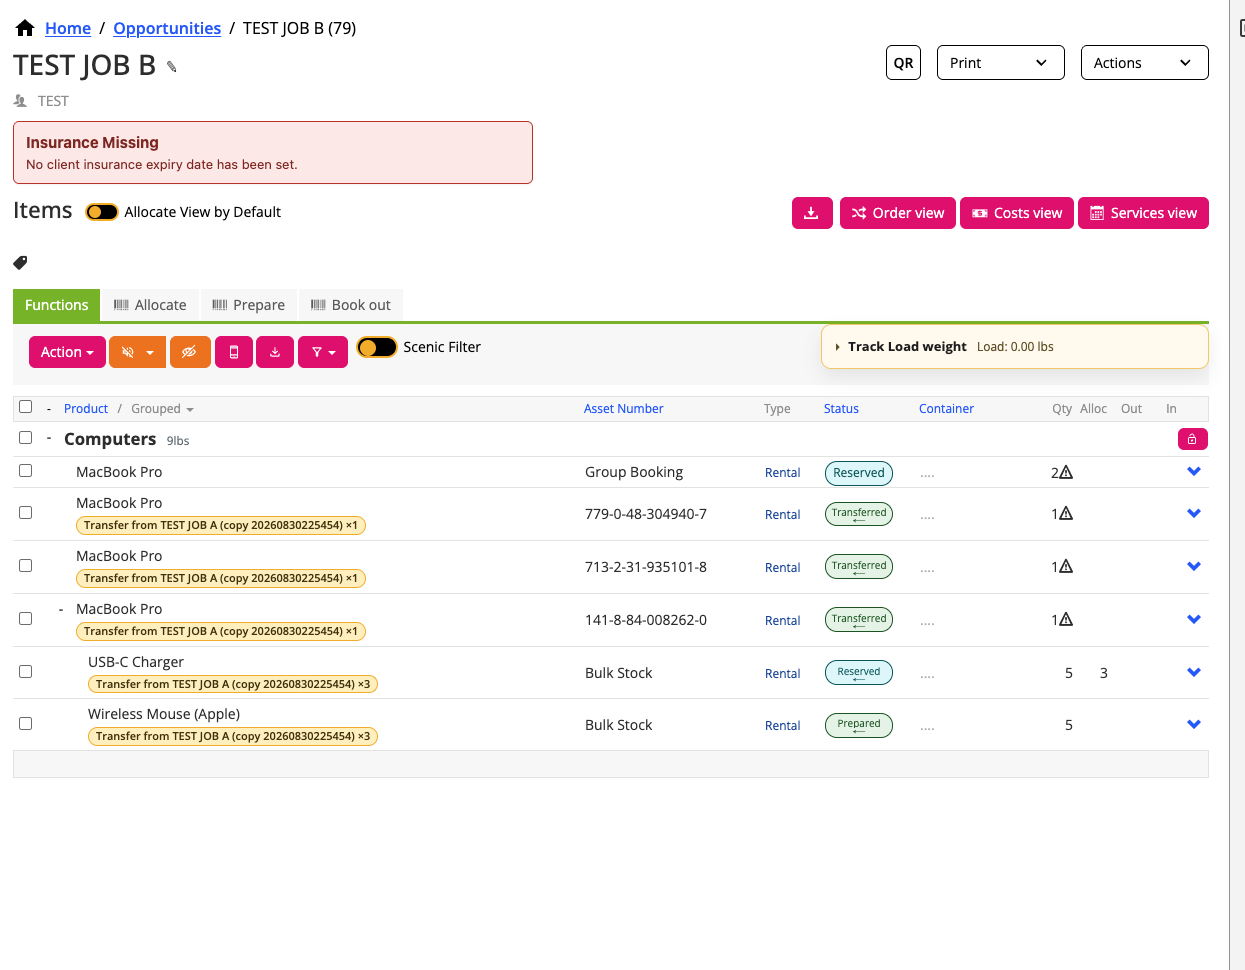
• A route bubble appears below the product name, for example Transfer from MOSELEY FOLK 2026 ×5 or Transfer to ASCP AWARDS 2026 ×2
• The quantity in this bubble is the planned transfer quantity, not necessarily the complete quantity booked on the job
• Incoming reserved items display an orange Transfer status
• Items that are already Allocated, Prepared, or Booked Out keep their real Current status
• Outgoing items keep their normal status and display a right-facing transfer arrow
• Incoming transfers use a left-facing arrow and outgoing transfers use a right-facing arrow
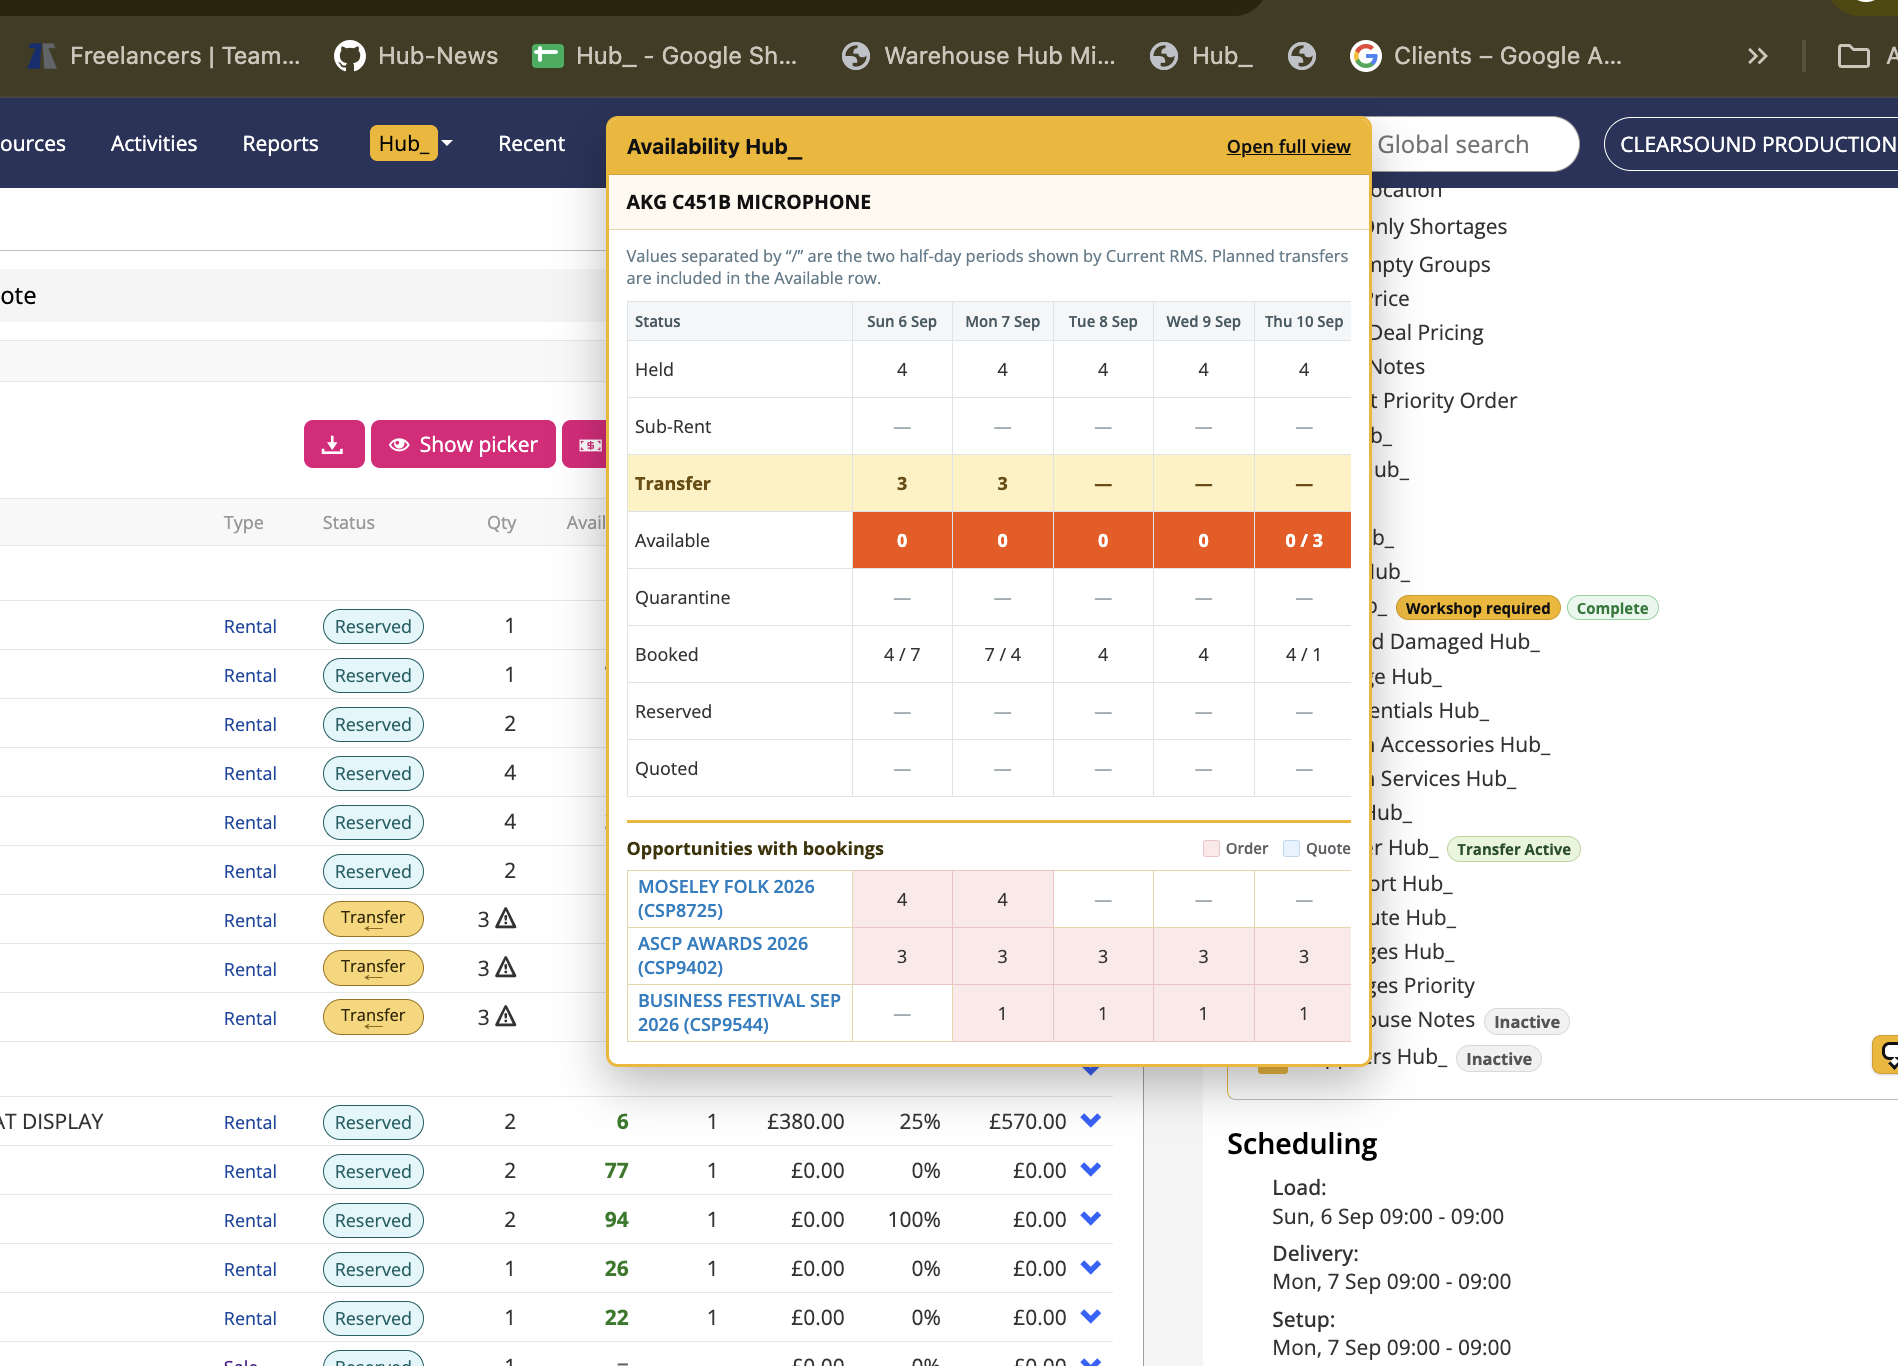
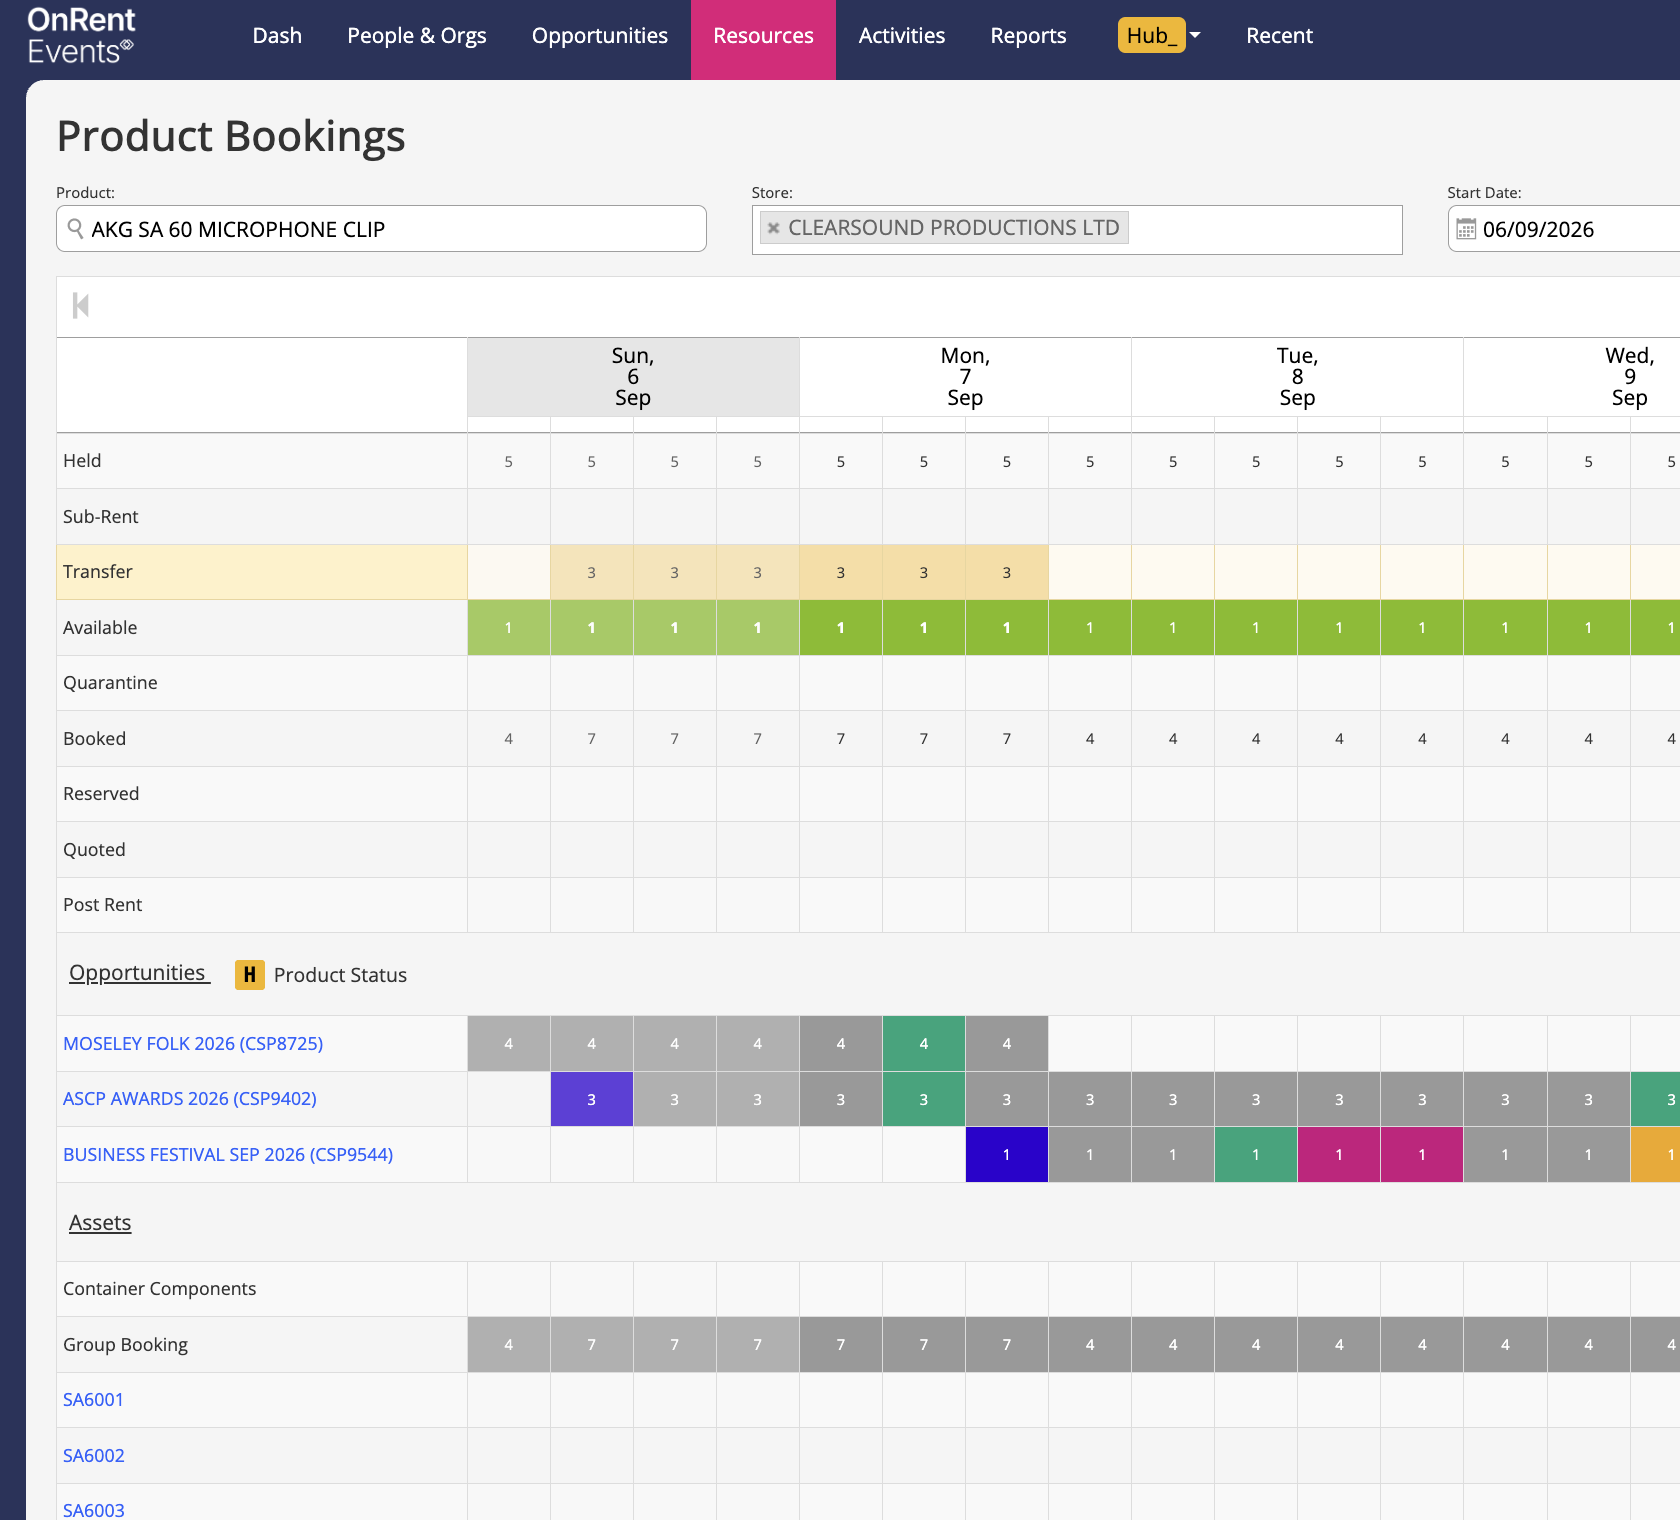
• When active transfers are present, the Avail column is displayed automatically and includes the planned movements in its projected figures
• Covered shortages are cleared visually when the planned quantity is sufficient
• A remaining shortage stays visible when the planned transfer only covers part of the required quantity
Managing Planned Transfers
Planned transfers can be reviewed and changed without recreating them.
How it works
• Transfer Active appears next to Transfer Hub_ when an opportunity has active plans
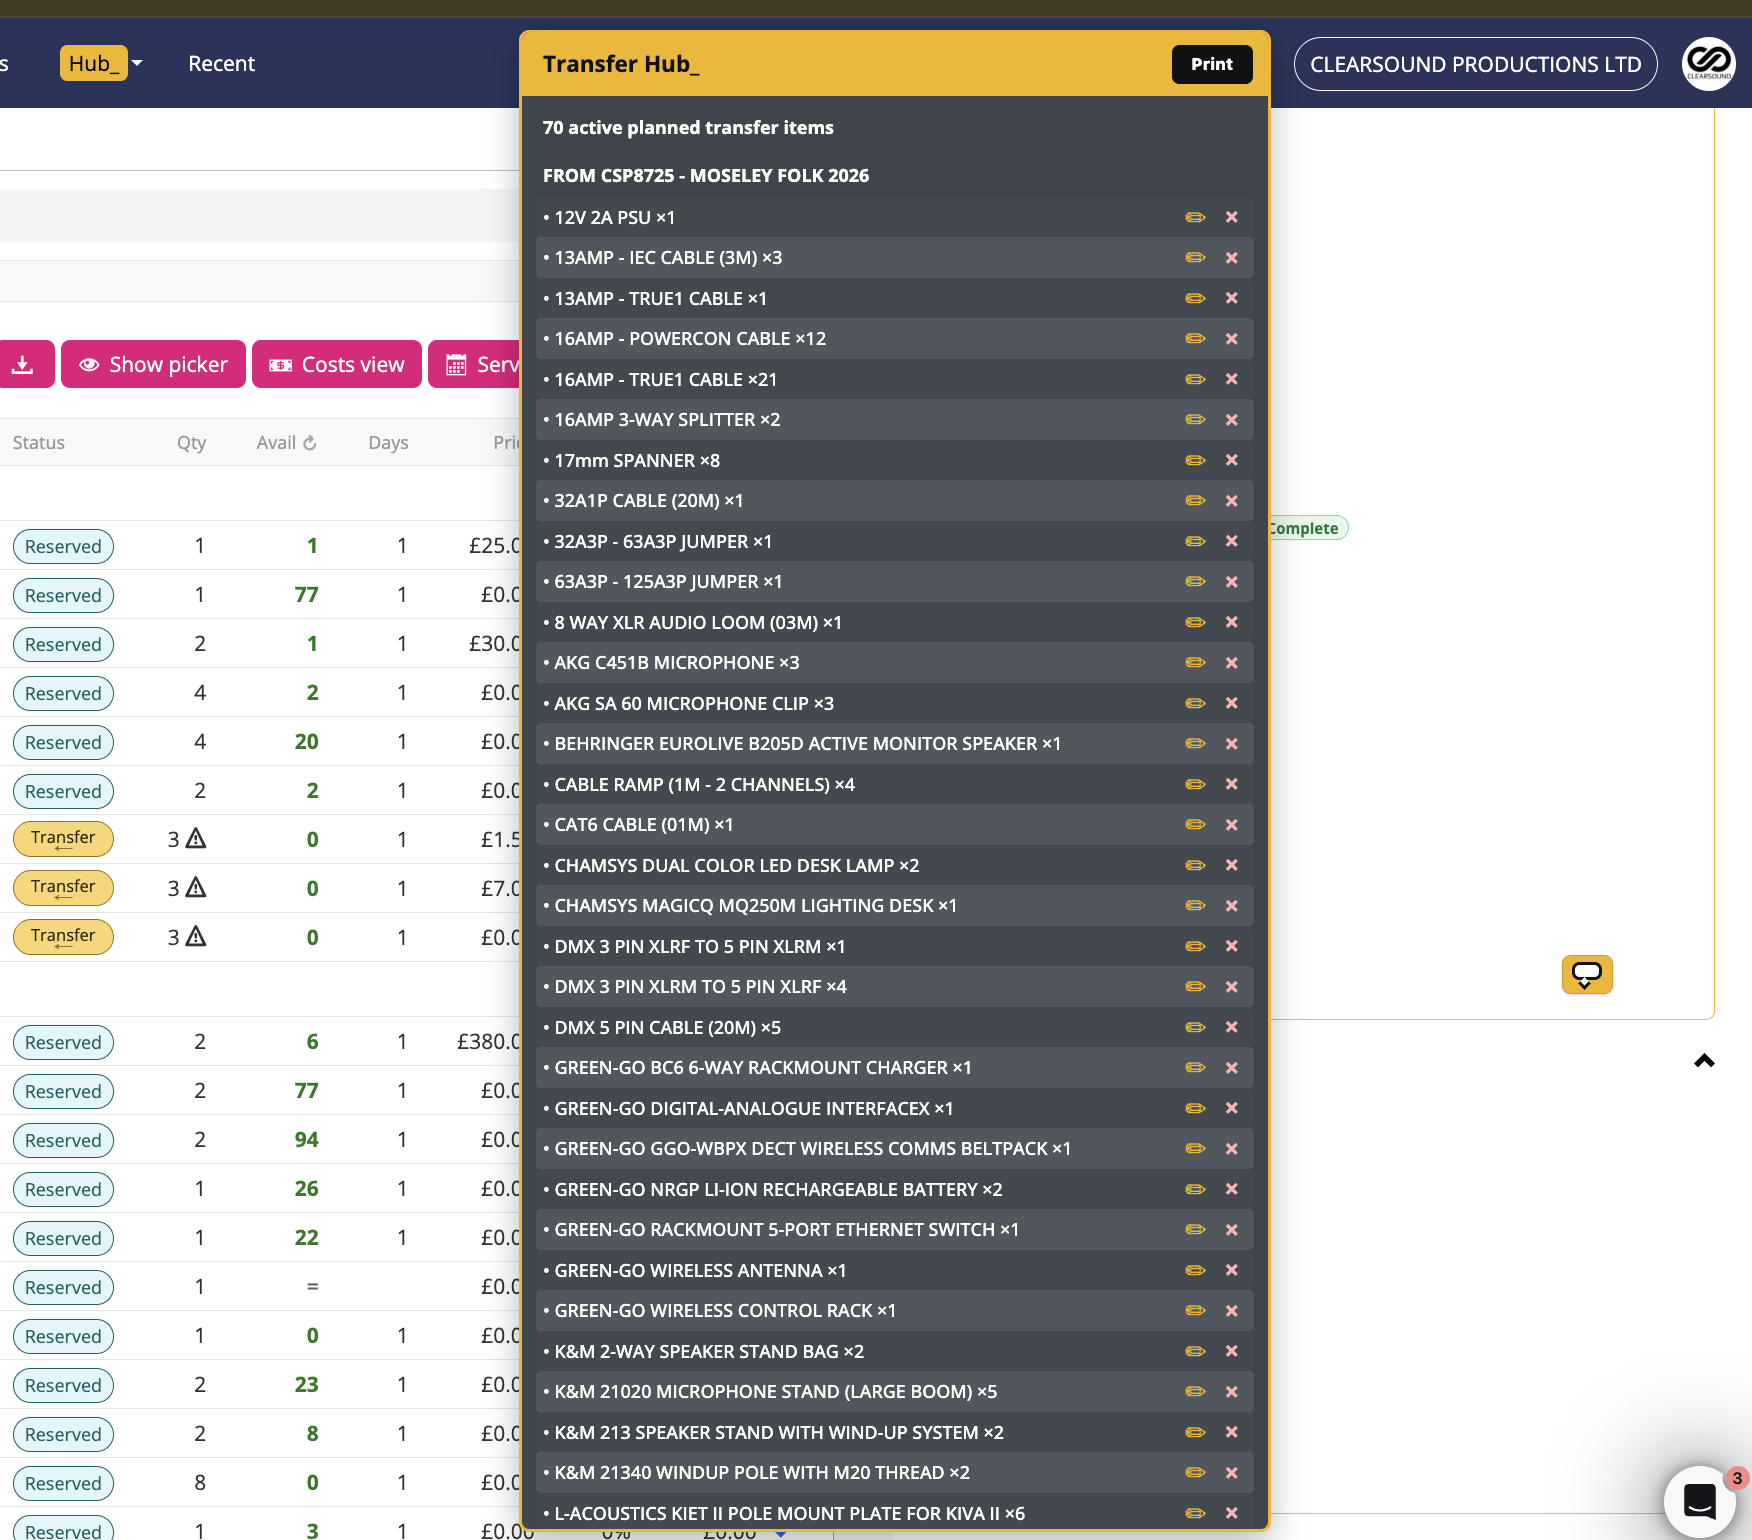
• Hover over Transfer Active to see all planned transfers grouped by source or destination job
• Each group displays the job number, job name, products, and transfer quantities
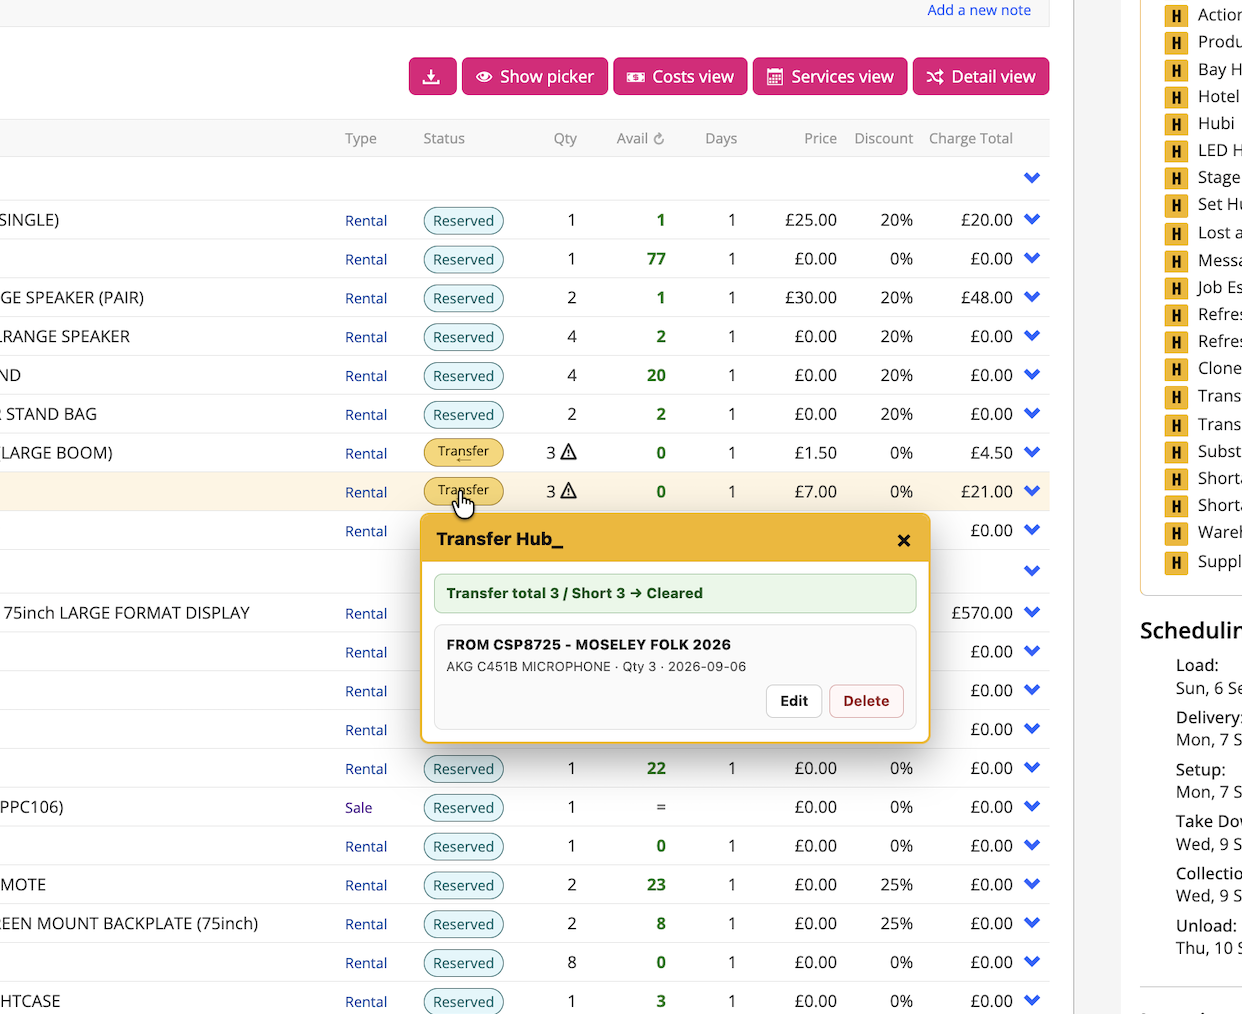
• Hover over a transfer bubble or transfer status on an item to see its full route and coverage information
• Existing transfers appear separately inside the Transfer Hub window
• Transfer Hub continues using previously loaded transfer information while checking for updated records, reducing the delay after a refresh
To edit a Planned Transfer
• Open Transfer Hub_ or hover over the relevant transfer marker
• Find the required item
• Select Edit
• Change the transfer quantity or execution date
• Select Save
• The route bubbles, availability figures, and remaining shortage will update automatically
To delete a Planned Transfer
• Open Transfer Hub_ or hover over the relevant transfer marker
• Find the required transfer
• Select Delete
• Confirm the deletion
• The plan will be removed from both linked opportunities
• Availability and shortage figures will return to their normal values if no other transfer covers the item
Reports
• Select Copy report to copy a written transfer summary
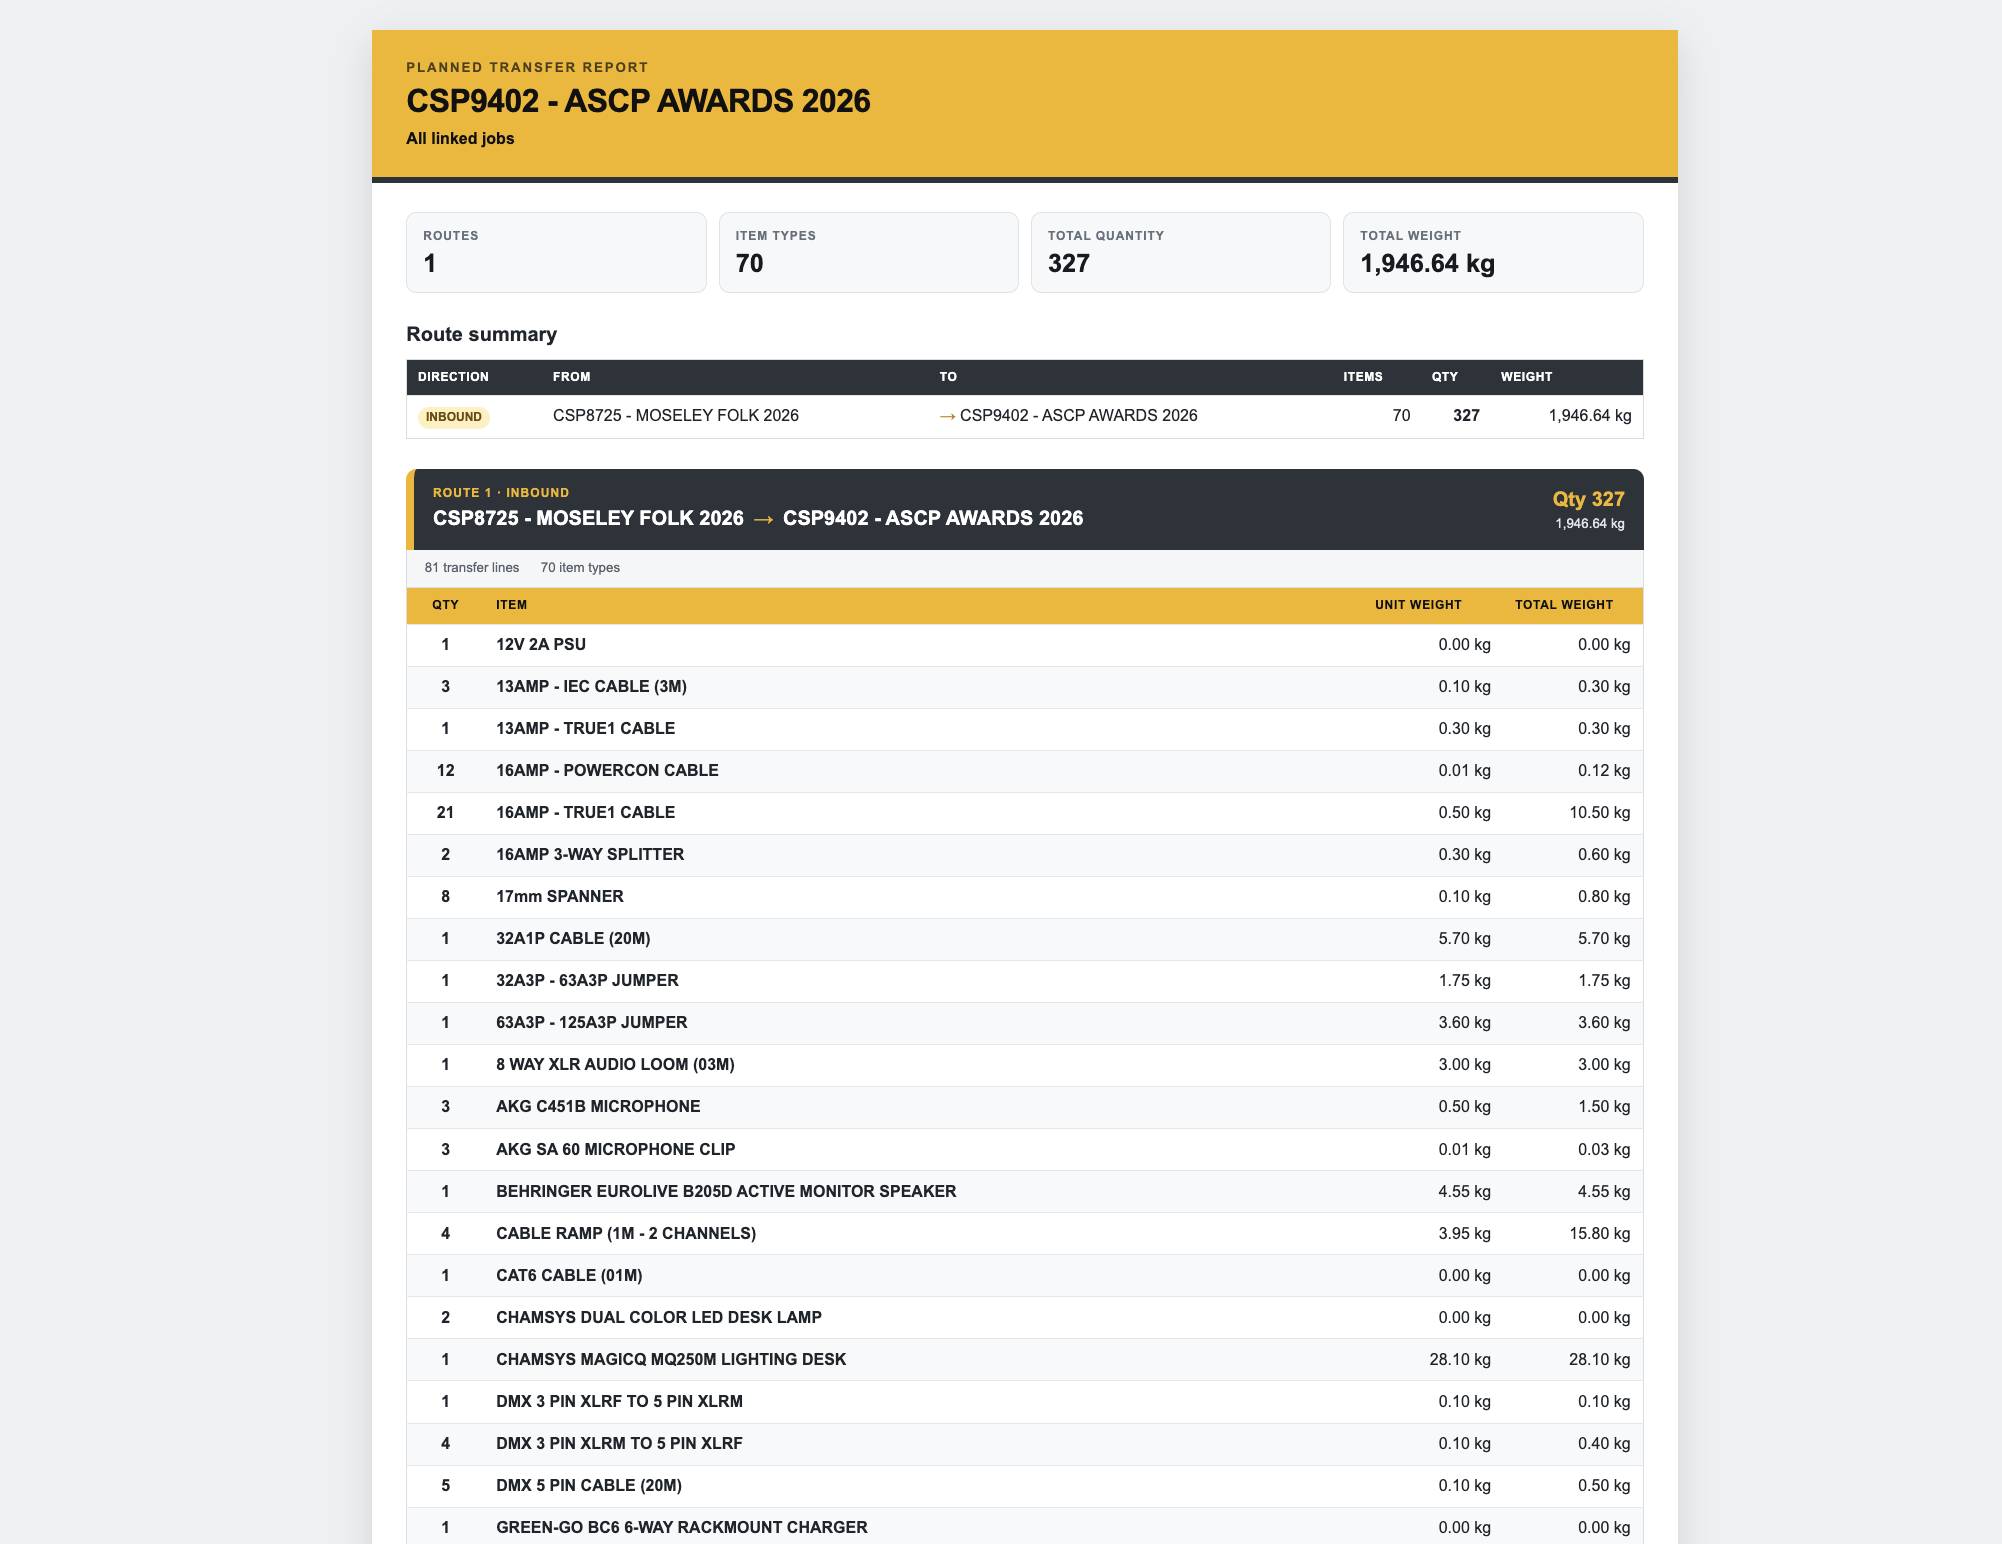
• Select Print report to open the branded Planned Transfer Report
• A print button is also available in the Transfer Active panel
• Reports group equipment by transfer route and include job details, items, quantities, individual weights, and total transfer weight
• Reports can be used as warehouse paperwork or shared with the teams working on both opportunities
Transfer Out — Detail View
Transfer Out completes the physical equipment movement. It takes the actual selected assets or Bulk Stock from the source opportunity and allocates them to the destination opportunity.
How it works
• Transfer Out is used from the source opportunity’s Detail View
• It works with selected serialised assets and Bulk Stock rows
• Group Booking rows are skipped because they do not represent the individual stock being moved
• Serialised assets must be fully Booked Out before they can be transferred
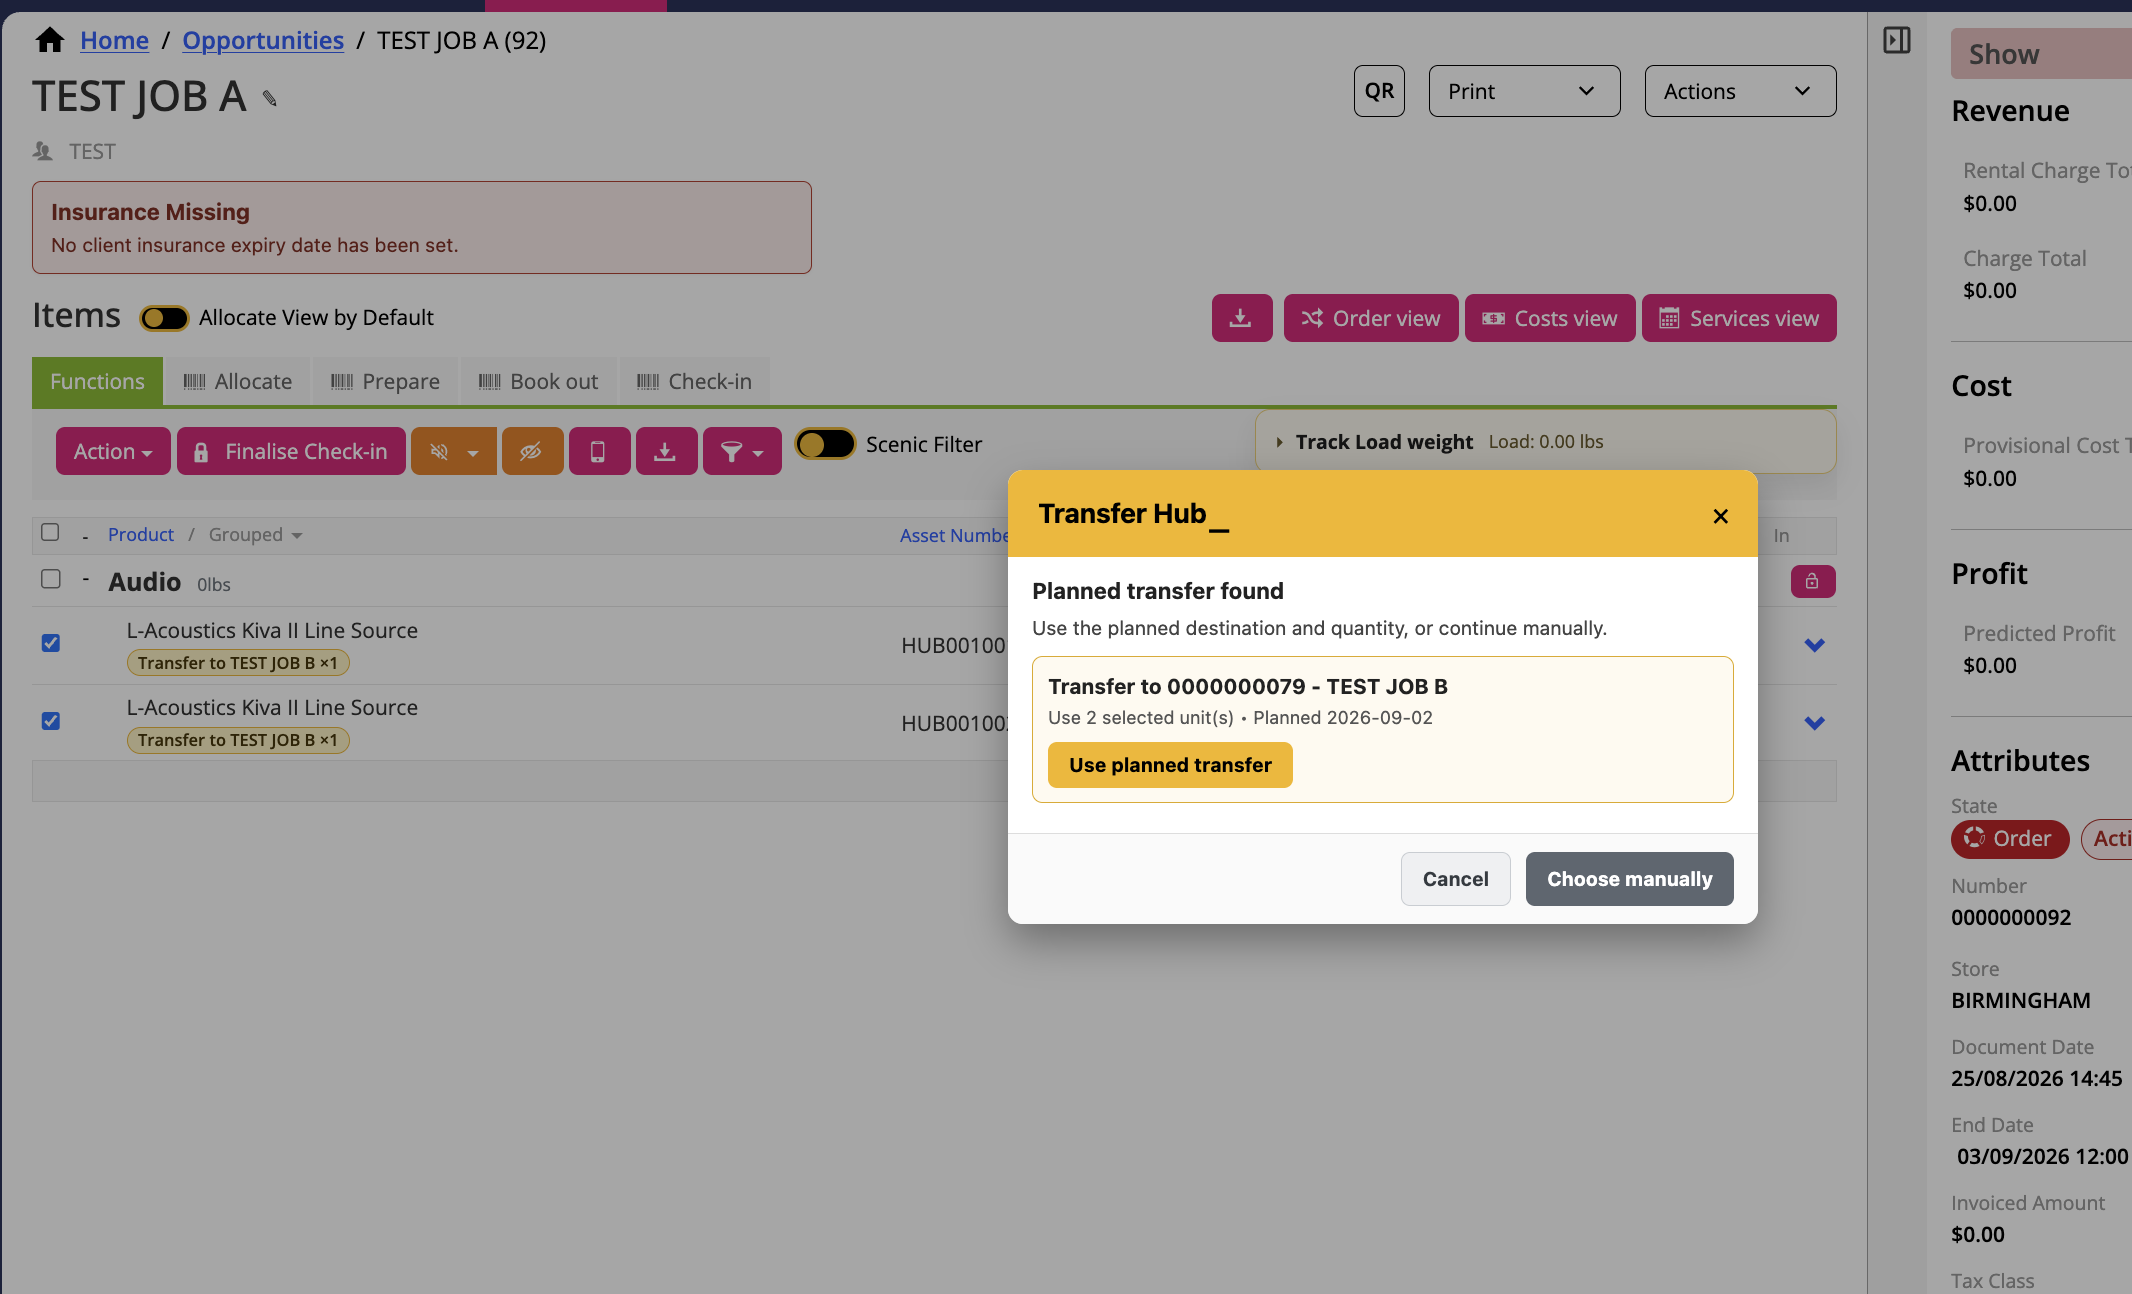
• If a matching Planned Transfer exists, Transfer Hub offers its destination and planned quantity automatically
• You can use the suggested plan or choose a destination opportunity manually
• When a planned route is used, only the matching quantity is transferred and any unfulfilled planned quantity remains active
• Successfully transferred quantities reduce or complete the corresponding Planned Transfer
• The assets are allocated to the destination opportunity and checked in against the source opportunity as required
To complete a Transfer Out
• Open the opportunity supplying the equipment
• Change to Detail View
• Allocate, prepare, and book out the equipment through the normal workflow
• Select the exact serialised asset or Bulk Stock rows being transferred
• Open Transfer Hub_ from the Hub_ menu
• If Transfer Hub finds a matching plan, select Use planned transfer
• Select Choose manually if the equipment is being transferred without an existing plan or needs a different destination
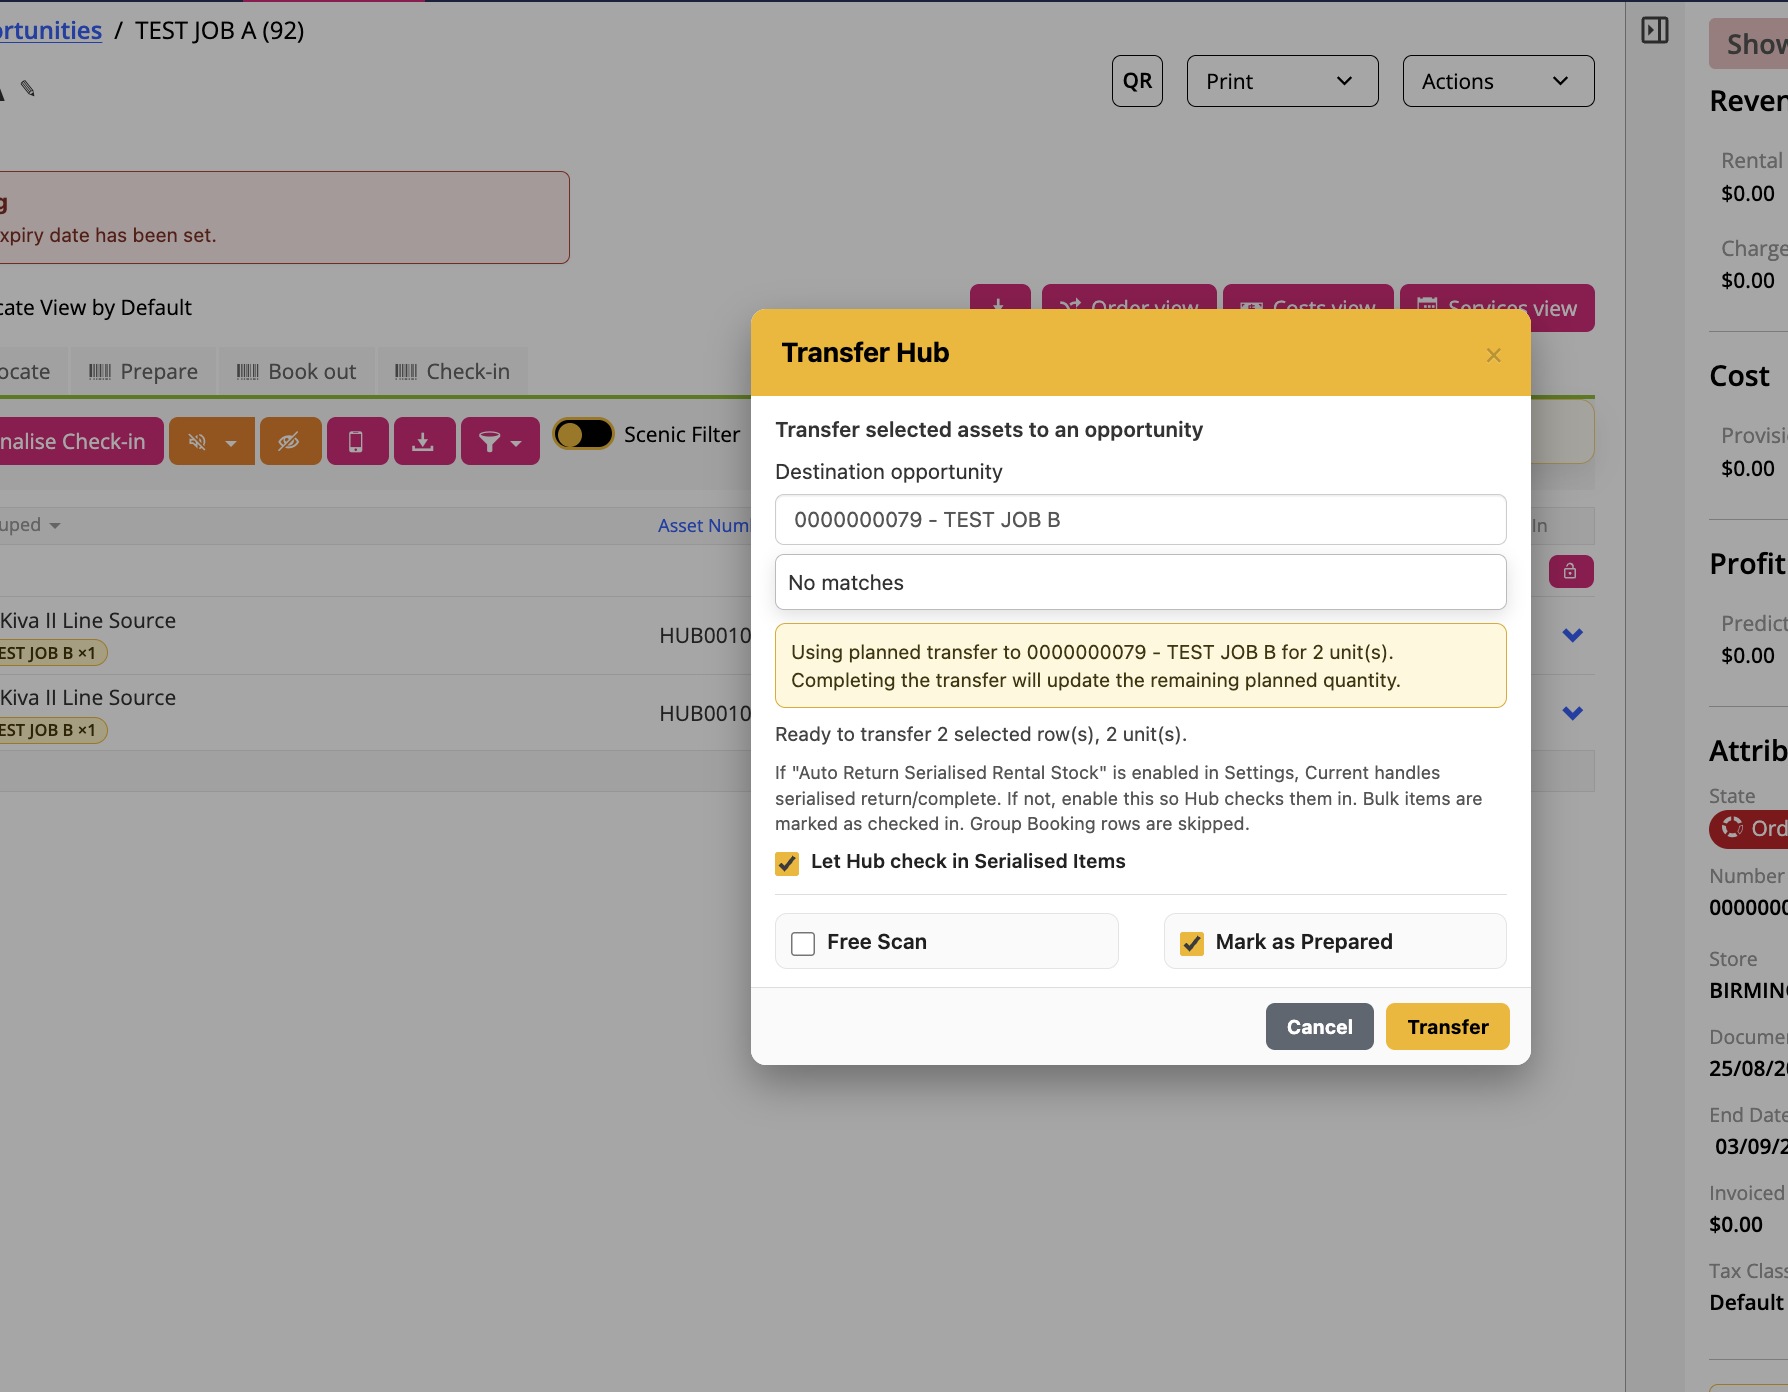
• Check the destination opportunity
• Review the selected rows and total quantity
• Choose whether Hub should check in the serialised items on the source job
• Apply Free Scan or Mark as Prepared if required by your Current workflow
• Select Transfer
• Review the final warning and select Yes, Transfer to proceed
• Transfer Hub will show progress while each asset is processed
Important checks
• Transfer Out cannot be reversed automatically, so carefully confirm the destination and selected assets before continuing
• We recommend enabling Current’s Auto Return Serialised Rental Stock setting so Current automatically completes serialised equipment on the source job
• If Current does not complete a transferred serialised item automatically, Hub will check it in as a fallback
• Bulk Stock is automatically marked as checked in on the source job
• Group Booking rows are skipped
• If Transfer Hub reports that assets are not booked out, book them out first and reopen Transfer Hub_
• If no items are detected, select at least one serialised or Bulk Stock row and try again
• After completion, check both opportunities to confirm that the source and destination quantities are correct
Recommended Transfer Workflow
1. Plan in Order View
• Create the Planned Transfer as soon as you know equipment will move between jobs
• Confirm the direction, linked opportunity, quantities, and transfer execution date
2. Review availability
• Check that the planned quantity clears the required shortage
• If a shortage remains, increase the transfer where possible or arrange an additional source
3. Prepare and book out
• Allocate, prepare, and book out the actual equipment on the source opportunity
• Confirm that the chosen serialised assets match what is physically moving
4. Complete in Detail View
• Select the booked-out assets or Bulk Stock
• Open Transfer Hub_ and use the planned destination
• Confirm the transfer and allow Hub to update the remaining planned quantity
💡 Why it’s useful
Transfer Hub separates advance planning from the physical movement of equipment, making shortages and planned coverage visible across both jobs. It reduces unnecessary warehouse returns between consecutive opportunities while maintaining asset traceability throughout the transfer. It also prevents duplicate or excessive transfer quantities, gives warehouse teams clear information about items, quantities, dates, routes, and weights, and keeps planned availability aligned with the equipment that is eventually transferred.